Ankle-Spanning External Fixation: Goals, Indications, and Operative Steps
When confronted with an unstable ankle fracture or a high-energy distal tibial fracture, severe soft-tissue swelling is often the first hurdle the orthopaedic surgeon must overcome. In such circumstances, early emergency open reduction and internal fixation (ORIF) may result in catastrophic soft-tissue complications. Consequently, damage control using an ankle-spanning external fixator has become an essential temporizing treatment modality. This article provides a detailed overview of the standardized operative steps and clinical pitfall-avoidance guidelines for ankle-spanning external fixation (in particular, the delta frame technique).
I. Core Goals and Indications
Core goal: To provide temporary fixation for an unstable ankle fracture or high-energy distal tibial fracture until soft-tissue conditions improve sufficiently to permit definitive internal fixation. By extending a triangular frame to the foot, the soft tissues can be stabilized, the foot held in a neutral position, and the risk of secondary equinovarus deformity reduced.
Clinical indications: Ankle fracture (ICD-10: S82.6, S82.7, S82.8) or fracture of the lower end of the tibia (ICD-10: S82.3).
Key anchoring bones: The tibial bone, the calcaneal bone, and the first metatarsal bone.
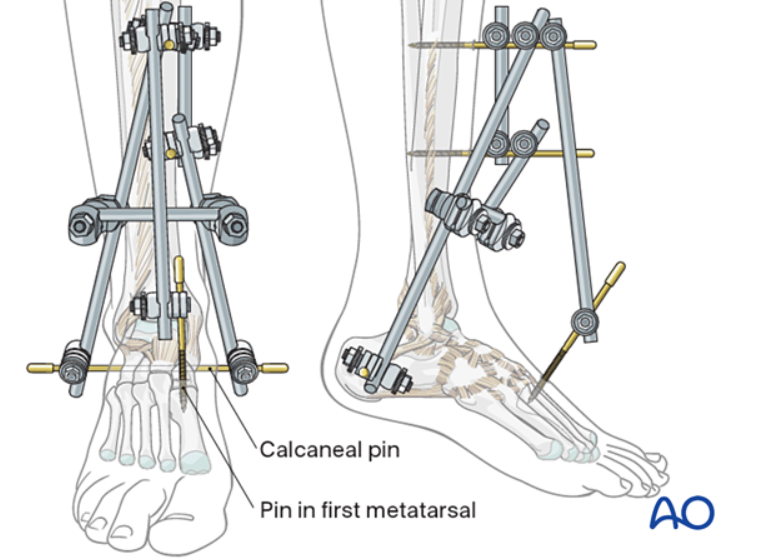
Joint-bridging triangular external fixation
II. Preoperative Preparation and Anesthesia
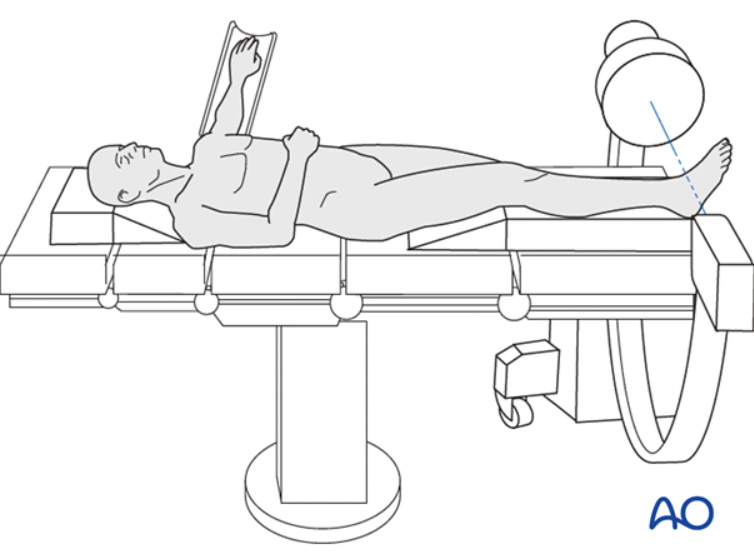
Positioning: The patient is placed in the supine position.
Choice of anesthesia: Either general anesthesia or neuraxial anesthesia is acceptable. However, if neuraxial anesthesia is selected, particular vigilance is required so as not to mask a potential compartment syndrome.
Preparation and draping: Routine sterile preparation of the lower limb, preserving an operative field extending from the knee joint to the toes.
III. Illustrated Core Operative Steps
1. Insertion of tibial pins
Site selection and incision: Palpate the anteromedial surface of the tibia. Full consideration must be given to the future site of definitive internal fixation, and the external fixation pins should be placed sufficiently proximal so that subsequent implants such as plates do not enter the pin-tract contamination zone. Make a small skin incision and dissect bluntly down to bone.
Drilling and pin insertion: Place the drill guide flush against the anteromedial tibia and aim the drill toward the posterolateral edge, ideally at an angle of 20–60° to the sagittal plane. This trajectory prevents the drill bit from sliding and injuring the soft tissues.
Bicortical fixation: Confirm under fluoroscopy that the pin has penetrated the opposite cortex; bicortical fixation is a prerequisite for reliable pin anchoring.
Parallel pin placement: Using a parallel drill guide and a soft-tissue protector, insert a second tibial pin at an appropriate distance and connect the pins with a clamp.
2. Insertion of the calcaneal and metatarsal pins
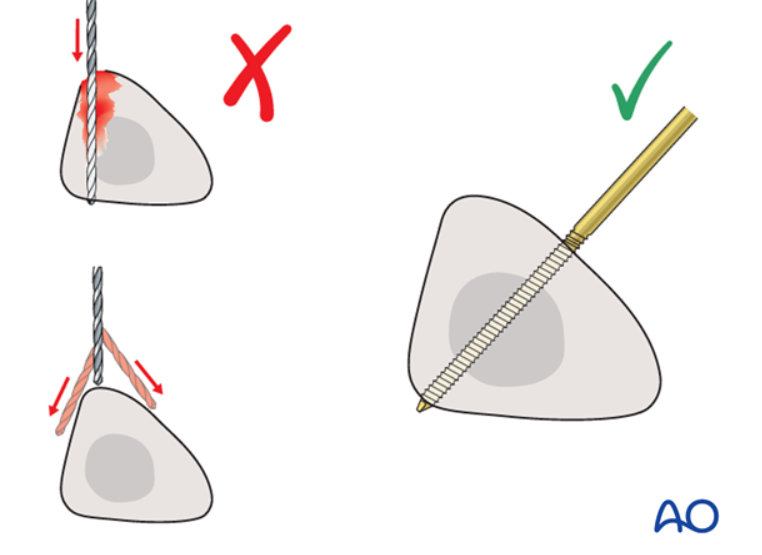
Calcaneal pin insertion: Palpate the calcaneus from the medial side, make a small incision, and dissect bluntly. Because the calcaneus is relatively soft, pre-drilling is usually unnecessary; a Steinmann pin can be inserted directly, either power-driven or manually, transversely through the calcaneal tuberosity from medial to lateral. Particular care must be taken to avoid the neurovascular bundle posterior to the medial malleolus.
Metatarsal pin anchoring: To maintain the foot in a neutral position, palpate the first metatarsal; the first tarsometatarsal joint may be marked with a needle and confirmed under fluoroscopy. After making an incision on the medial aspect of the first metatarsal and dissecting bluntly, insert a thinner half-pin directly.
3. Fracture reduction and frame construction
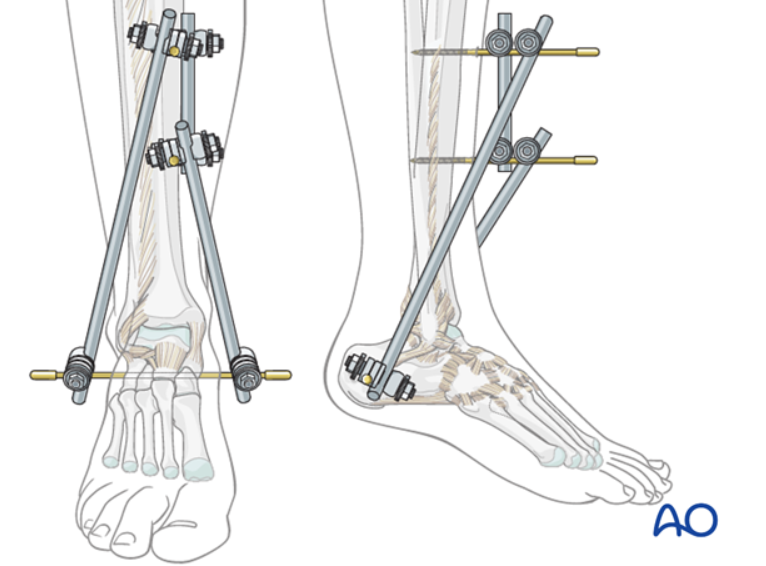
Initial connection: Connect the two ends of the calcaneal pin to the tibial pins with connecting rods; at this stage, do not fully tighten the clamps.
Reduction by manipulation: Reduce the fracture through traction and manipulation of the calcaneal pin.
Locking and confirmation: Once reduction is satisfactory, tighten all rod clamps and use fluoroscopy to verify that the length, alignment, and rotation of the fracture are acceptable. To increase stability, an additional short rod may be placed between the two tibial–calcaneal connecting rods as a bridging fixation.
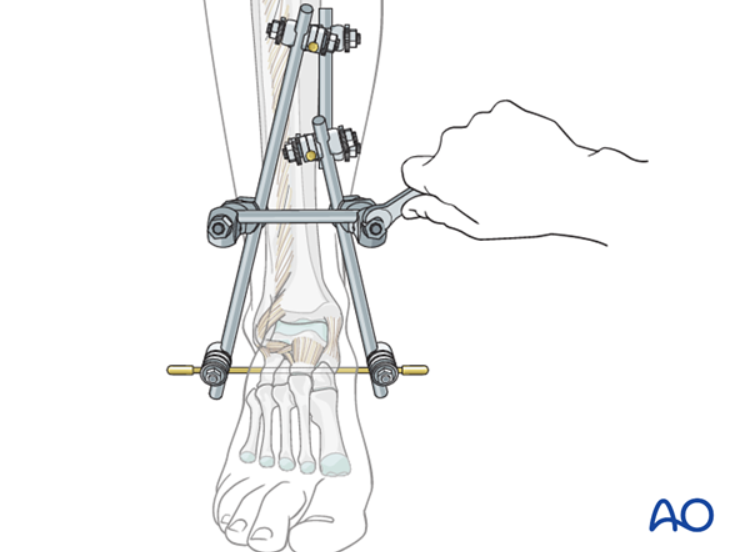
IV. Clinical Pitfall-Avoidance Guidelines and Complication Prevention
1. Avoiding fixation failure due to poor pin placement
If a pin is placed too close to the bone edge rather than centrally, the risk of pin breakage or iatrogenic fracture (stress concentration) increases.
The pin must completely penetrate the opposite cortex; otherwise, it will readily loosen and fail.
If the rod clamps are not fully tightened, fixation will be unstable and fracture reduction will be lost.
2. Strictly preventing injuries to neurovascular structures
After incising the skin, blunt dissection down to bone is essential. Particularly on the medial side of the metatarsal, rough handling can very easily injure cutaneous nerve branches or superficial vessels.
If a tibial pin is drilled too deeply or in the wrong direction — deviating from the correct anteromedial-to-posterolateral trajectory — the posterior tibial artery and tibial nerve in the deep posterior compartment may be injured.
During calcaneal pin insertion, the assistant's hand must never be placed on the lateral side of the calcaneus, to avoid accidental puncture injury; at the same time, ensure the toes point upward to prevent inadvertent penetration of the sterile drape.
3. Soft-tissue and pin-tract infection control
The clamps should be positioned relatively close to the skin to improve construct stability, but connecting rods or any component of the frame must never come into direct contact with the skin; adequate space must be reserved for further postoperative soft-tissue swelling.
If a tibial external fixation pin is placed too close to the fracture line, it creates a risk of infection tracking directly from the skin to the fracture site during subsequent open reduction and internal fixation.
Routine use of ointments or antibiotic solutions for pin-tract care is not recommended; simply keep the site clean, free of drainage, and properly dressed. If a pin-tract infection occurs, the affected pin must be removed and the infection thoroughly eradicated before conversion to definitive internal fixation; otherwise, it will lead to severe deep infection.
V. Principles of Postoperative Management
Elevation of the limb: Postoperatively, elevate the lower limb slightly on a pillow to promote venous return and reduce swelling.
Timing of conversion to definitive surgery: Once soft-tissue conditions have clearly improved and swelling has subsided, the temporary external fixator can be removed and definitive open reduction and internal fixation performed on an elective basis.